|
|
 |

Installation & Calibration
To check if the transducers and load cells are functioning properly, the following should be evaluated: Does the weight indication return to zero when the system is empty or unloaded? Does the indicated weight double when the weight is doubled? Does the indicated weight remain the same when the location of the load changes (uneven loading)? If the answers are yes, the cells and transducers are probably in good condition and need no attention.
Before calibration, the mechanical system should be examined and the cell installation checked for the following:
Inspect the load cell cables, and coil and protect any excess.
The load should be equally distributed among multiple load cells of multiple load cell installations. If they differ by more than 10%, the load should be rebalanced and adjusted with shims.
When calibrating, installing, or removing a cell, the vessel should be lifted without unloading or overloading the other cells. The design of the system should provide for jacking and the horizontal removal of the cell.
Dummy load cells should be used in place of operational ones until all construction and welding are completed.
The calibration of the vessel requires hangers or shelves to support the calibration weights. For an ASME vessel, they must be added when the vessel is fabricated. Calibration to an accuracy of 0.25% full scale or better is usually performed with dead weights and is the only calibration method recognized by weights and measures agencies. All calibration starts by zeroing the system:
During deadweight calibration, the vessel is evenly loaded to 10% of the live load capacity using standard weights. The weight indication is recorded and the weights are removed. Next, process material is added to the vessel until the weight indicator registers the same (10%) weight as it did with the calibration weights. Now the calibration weights are loaded on the vessel again and the reading (now about 20%) is recorded. These steps are repeated until 100% of capacity is reached.
Live weight calibration is a novel and faster method, which uses pre-weighed people instead of calibration weights. The procedure is identical to deadweight calibration. This method should not be used if there is a risk of injury.
 |
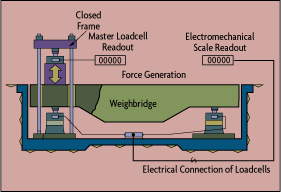
Figure 8-4: Master Load Cell for
Weighbridge Calibration
|
The "material transfer" method of calibration uses some other scale to verify weight. This method is limited by the accuracy of the reference scale and risks some error due to possible loss of material in transfer.
A master cell can also be used for calibration as long as the master is about three times more accurate than the accuracy expected from the calibrated system. The calibration procedure involves incremental loading and the evaluation at each step of the output signals of both the calibrated weighbridge and of the master load cell (Figure 8-4). The number of divisions used and the method of applying the force (hydraulic or servomotor) is up to the user.
If a load cell system is causing problems, four tests can be conducted:
Mechanical Inspection: Check the load cell for physical damage. If it has been physically deformed--bent, stretched or compressed relative to its original shape--it is not repairable and must be replaced. Look for distortion or cracks on all metal surfaces. Flexure surfaces must be parallel to each other and perpendicular to both end surfaces. Check all cables along their entire length. Nicked or abraded cables can short out a load cell.
Zero Balance (No Load): Shifts in the zero balance are usually caused by residual stress in the sensing area. Residual stresses result from overloading the cell or from repeated operation cycles. With a voltmeter, measure the load cell's output when there is no weight on the cell. It should be within 0.1% of the specified zero output signal. If the output is outside the zero balance tolerance band, the cell is damaged but perhaps correctable.
Bridge Resistance: Measure the resistance across each pair of input and output leads. Compare these readings against the specification of the load cell. Out-of-tolerance readings are usually caused by the failure of one or more elements, typically the result of electrical transients or lightning strikes.
Resistance to Ground: Connect all the input, output, sense and ground leads together, and measure the resistance between the load cell body and the leads with an ohmmeter. The reading should be at least 5,000 megaohms. If the load cell fails this test, repeat the test without the ground wire. If it still fails, the load cell requires repair. If it passes, the problem may be in the load-cell cable. It is usually the infiltration of moisture that causes short circuiting (current flow) between the load cell's electronics and the cell body.
Specialized Installations
Leg-mounted load cells measure stress changes in the vessel's support structure and can determine tank weights to between 0.1% and 0.5% full-scale accuracy. These cells can be installed on existing tank supports, and several can be mounted or bolted to the legs of a vessel. The legs can be made of I-beams, pipes, concrete-filled pipes, or angle iron.
These load cells are available in single and double-axis designs. Double-axis cells are able to provide perpendicular strain monitoring of thermal or other (interfering) stresses, which can eliminate errors from the primary signal. If single-axis cells are used, a second cell can be installed perpendicular to the first to measure and eliminate errors caused by thermal stresses.
These cells are very temperature sensitive and therefore require sun and wind shielding and insulation. Locating the cell on an I-beam web will minimize temperature error. The base metal of single-axis cells must exactly match the vessel leg material, or errors will be introduced. If dual-axis cells are used, they compensate for material differences and this will not be a concern. The best design is to mount a dual-axis cell at the center of the I-beam web. The next best is to install two single-axis cells mounted opposite each other on the face of the flange where the flange is joined to the web.
 |
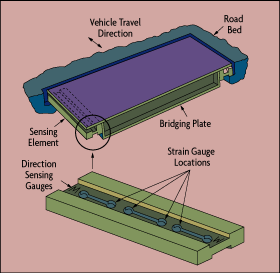
| Figure 8-5: Treadle Scale Design
|
Treadle scales eliminate the complexity of building vehicle scales from individual load cells, weigh- bridges, and stabilization hardware, and therefore are less expensive (Figure 8-5). A treadle scale is a self-contained unit that can be readily lowered into a shallow pit. In addition to being accurate, directional strain gages are provided to sense vehicle motion.
 |
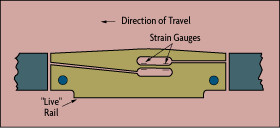
| Figure 8-6: Monorail Weighing Transducer
|
Monorail weighing transducers measure "live" loads using integrated load cell and flexure assemblies built into a single self-supporting module (Figure 8-6). The strain gage arrangement in this module detects the correct weight independent of load position. The sloping arrangement on the top of the module decouples the load from the "pusher" during weight measurement and thereby eliminates these forces.
Belt weighing systems are used on flat or trough belts. Flat belts are more accurate, but also tend to spill more material. This type of weighing system consists of load cells supporting a set of rollers, including three idler rollers on either side that stabilize and support the belt and its contents as they move over the scale. Delivered weight is determined by integrating the product of weight and belt speed signals.
The weighing system should be located away from the material loading impact and spread area, and on the opposite end from the drive pulley to avoid high belt tension. Belts should be single-ply, flexible, and should track without lateral movement. The belt tension should be maintained by weight-and-pulley to minimize jamming or resistance to movement. Belt tension should be adjusted after monitoring the system's response with more or less tension. A loose belt causes side load error because of belt slap or wrap, while a tight belt can cause the load cell to measure belt tension instead of load.
 |
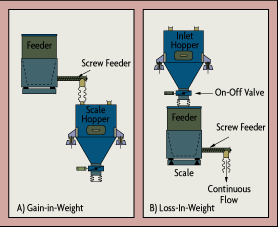
Figure 8-7: Load Cell Configurations
for Solids Batching
|
Load cells are widely used in applications requiring precision weighing of solid and liquid materials. Depending on whether the receiver or dispenser is being weighed, these applications are referred to as gain-in-weight or loss-in-weight configurations (Figure 8-7).
Loss-in-weight scales measure the rate at which the total weight in the dispensing tank changes. They are used to control small mass flow rates into a process. These scales consist of a small load cell system, a differentiating measurement and control system and a variable speed dispenser. Normally, the speed of the dispenser is adjusted to maintain the mass flow rate into the process; during the refill cycle, it is held constant at its last setting.
The scale hopper is weighed by load cells connected via a summing box to a weight transmitter. The control system runs the screw feeder at a high rate of speed (bulk rate) until the total target weight is approached. At that point the control system slows the screw feeder down to a "dribble rate". The screw feeder continues charging at the dribble rate for a short period of time, stopping just before the target weight is attained.
The difference between the target weight and the weight at which the screw feeder is stopped is called the "pre-act" weight. This pre-act difference setting allows the control system to consider the in-flight material that is still falling from the screw feeder into the scale hopper. The pre-act weight can be adjusted either manually or automatically, and its correct setting is critical for high accuracy applications.
In the case of loss-in-weight batching, a feeder is provided with an on-off valve at its inlet and with a variable speed screw feeder at its outlet. The entire feeder, including the inlet hopper and the screw feeder, is mounted on load cells. When the feeder inlet valve is closed, the slope at which the total weight is dropping indicates the continuous discharge from the feeder. This slope is controlled by "loss-in-weight" controls, which calculate the rate at which the total weight is changing. The feed rate is set in pounds per hour, and the control system regulates the speed of the screw feeder to maintain this desired discharge feed rate.
The control system speeds up the screw feeder when the feed rate is below setpoint, and slows it down when it is above setpoint. When the feeder is nearly empty, the control system switches the feeder into its refill mode. In this mode, the inlet valve is opened and it is kept open until the desired full weight is reached.
| |
References & Further Reading |
| |
Omegadyne Pressure, Force, Load, Torque Databook, Omegadyne, Inc., 1996 |
| |
The Pressure, Strain, and Force Handbook, Omega Press LLC, 1996. |
| |
"How to troubleshoot your electronic scale," Brent Yeager, Powder and Bulk Engineering, September, 1995 |
| |
"Ten rules for installing a belt scale", Steve Becker, Powder and Bulk Engineering, September, 1996. |
| |
"Flat-belt weigh feeder accuracy: How to achieve it, maintain it, and verify it", Pete Cadou and Chuck Homer, Powder and Bulk Engineering, September, 1997. |
| |
Electronic Weigh Systems Handbook, BLH Electronics, 1986. |
| |
Instrument Engineers' Handbook, Bela Liptak, CRC Press LLC, 1995. |
| |
Marks' Standard Handbook for Mechanical Engineers, 10th Edition, Eugene A. Avallone, and Theodore Baumeister, McGraw-Hill, 1996. |
| |
McGraw-Hill Concise Encyclopedia of Science and Technology, McGraw-Hill, 1998. |
| |
Process/Industrial Instruments and Controls Handbook, 4th Edition, Douglas M. Considine, McGraw-Hill, 1993. |
| |
Van Nostrand's Scientific Encyclopedia, Douglas M. Considine and Glenn D. Considine, Van Nostrand, 1997 |
| |
Weighing and Force Measurement in the 90's, IMEKO TC, 1991. |
|
