|
Looking for Water and Soil Analysis Instrumentation? - Click Here!
Introduction
This article defines turbidity, how it is measured,
and the effects that suspended particle size, shape, distribution,
and stray light have on the turbidity measurement. Information is
also provided on calibration standards and the different optical
configurations that are available.
 Definition
and Measuring Principle Definition
and Measuring Principle
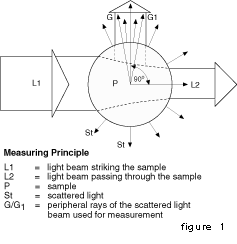
Turbidity is defined as an "expression of the optical property
that causes light to be scattered and absorbed rather than transmitted
in straight lines through the sample."1 Simply stated, turbidity
is the measure of relative sample clarity. It is not color. Figure
1 shows the interaction of a light beam and undissolved, finely
distributed particles known as suspended solids. When the light
beam passes through the sample of fluid, the suspended solids
scatter the light in all directions (360°spherically). Reduction
in the intensity of the light beam is primarily caused by the
suspended solids scattering the light. However, absorption (color)
from dissolved substances can also reduce the intensity and should
be taken into consideration by manually or automatically subtracting
its effect. This can be accomplished optically if a turbidimeter
is used (refer to the "Modulated Four-Beam Method" later in this
article for details) or electronically if a separate absorption
photometer is used in combination with a turbidimeter and their
outputs are subtracted. Low quantities of suspended solids are
normally monitored by measuring the scattered light effect rather
than the absorption effect because with scattered light, the photocell
detects small changes in light intensity with respect to a dark
background. The disadvantage occurs at higher suspended solids
levels where multiple scattering limits the amount of side-scattered
light received by the photocell. This condition results in lower-than-actual
turbidity readings. At suspended solids concentrations above 2000
ppm, alternate measurement methods such as absorption must be
used in place of the turbidity measurement. Turbidity measurements
provide a reading of the amount of scattered light and cannot
be directly related to a gravimetric equivalent unless a working
curve for the specific sample is created. The intensity of scattered
light is affected by many variables including wavelength, particle
size, color, and shape.
Particle
Effects
There is no absolute difference between dissolved and undissolved
matter. The water treatment authority considers all particles
of less than 0.45 microns in diameter as being dissolved. It is
important to note that particles smaller than 0.45 microns will
also scatter light.
The
amount of scattered light is not the same in all directions and
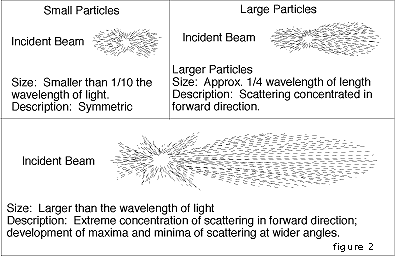
the spacial distribution pattern varies with particle size. Figure
2 illustrates this fact in which large and small particles show
different lines of equal light intensity.
Scattering
distribution patterns show that when particles are equal to or
larger than the wavelength of the incident light beam (1 micron),
there is a higher amount of forward scattered light. As the particle
size becomes smaller, the pattern becomes somewhat peanut-shaped
(see Figure 2). However, particles smaller than 0.05 microns in
diameter (colloids) scatter light equally in all directions.
Other
Factors Which Influence Light Scattering are:
1.
Particle color-This determines the ability to absorb or reflect
the incident light beam. For example, two different types of
filter beds are typically used in water treatment: carbon and
sand. The sand is light in color which reflects the incident
beam very well. Conversely, the black carbon has a tendency
to absorb the incident beam. Therefore, with all else being
constant (particle size, shape, etc.), the fines from carbon
filters have lower scattered light intensity.
2. Particle shape-This determines the ability of the suspended
solids to provide a constant spatial distribution pattern. A
smooth, spherical-shaped particle will provide predictable results,
whereas an irregularly-shaped particle can produce widely varying
responses depending on the side that the incident light beam
strikes.
3.
A difference between the refractive indexes of the particle
and the sample fluid-This allows light scattering to occur.
The intensity of the scattered light increases as the difference
increases.
Optical
Design Elements
The properties of suspended solids are not the only factors affecting
the value of scattered light. Other important factors include:
- the angle of detection
- light beam aperture
- incident beam wavelength
- color sensitivity of the photocell
The
influence of the angle of measurement can be seen in Figure 2.
As the suspended particle size changes, the intensity of light
which is scattered in all directions changes. An instrument which
measures at 90° will be different than an instrument which measures
in a forward direction. Additionally, as the wavelength of detection
changes, the scatter pattern will again be altered. The type of
light source, photocell, and filter that are used in a turbidimeter
determine its color sensitivity spectrum. The closer to a single
wavelength the color sensitivity spectrum, the more consistent
the scatter pattern which will be produced.
 Optical
Design Limits Optical
Design Limits
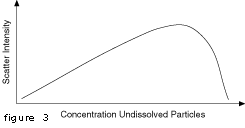
There is a relationship between the total suspended solids in
the liquid and the light intensity due to particle scatter. This
relationship can be determined through the development of a working
curve for each specific sample (see Figure 3). This relationship
exists up to a transition point where the rate of scatter intensity
no longer increases with more undissolved particles. This point
is the maximum limit of the optical design of a turbidimeter.
Light
which is detected by the photocell that is not caused by the scattering
of light by suspended particles is called "stray light". The lower
limit of the optical design of a turbidimeter is dependent on
the amount of stray light. Causes of stray light include reflections,
scattering by dust, scratches or fingerprints on the sample cell,
or imperfections of the glass.
 Optical
Measuring Configurations Single-Beam Method Optical
Measuring Configurations Single-Beam Method
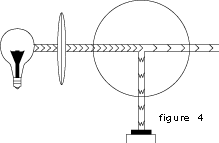
This basic instrument design uses a single light source and a
single photodetector located at 90 degrees to the transmitted
light as shown in Figure 4. This design, which has been in existence
for many years, has some inherent problems. Immediately after
the light source is turned on, it begins to slowly burn out which
reduces its intensity. Since instrument calibration is based upon
the light intensity, this reduction necessitates frequent calibration
to re-establish a new value of the scattered intensity.
Turbidity
Measurement Modulated Four-Beam Method Optical DiagramCalibration
Standards
Every turbidimeter, regardless of its optical configuration, must
be calibrated with a known standard. This is the reference to
which the measured values are compared. The most widely used measurement
unit for turbidity is the FTU (Formazin Turbidity Unit). This
unit can be used for all turbidimeters which employ formazin as
the calibration standard. The USEPA uses formazin but states its
measuring units as NTU (Nephelometric Turbidity Units). ISO refers
to its units as FNU (Formazin Nephelometric Units).
Formazin
suspension is the polymerization of hexamethylenetetramine and
hydrazine sulfate under strictly controlled conditions. Although
formazin offers advantages over sand or diatomaceous earth, it
still lacks the long term stability and reproducibility necessary
in a universally accepted primary standard.
Formazin
is produced in a 4000 FTU (Formazin Turbidity Unit) suspension.
Reproducibility of this suspension using the same hexamethylenetetramine
and hydrazine sulfate is ± 1%. (Suspensions using different brands,
lots, etc. of hexamethylenetetramine and hydrazine sulfate have
a ± 15% reproducibility.) The subsequent dilutions of this suspension
to lower turbidity values become more unstable with greater dilution.
It is recommended that diluted calibration suspensions be used
immediately and properly disposed.
Most modern day turbidimeters are equipped with a secondary calibration
standard. These standards are used to standardize the instrument
or check calibration to determine when calibration with formazin
is necessary. Secondary standards made of liquids or gels are
still unstable and must be replaced each year. The only absolute
stable standard is turbid glass. A calibration glass standard
consists of small particles uniformly suspended in a specially
formulated glass cube. The turbidity value of this glass cube
lasts indefinitely. It cannot be affected by time, temperature
or, most importantly, by a change in personnel performing the
calibration.
Standard
Specifications
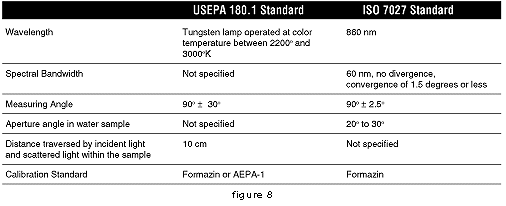
There are two standard specifications for turbidity measurement
which are generally in use worldwide. These are the international
standard ISO 7027 (1984 edition) and the USEPA 180.1. The specification
for the ISO standard is more stringent and requires the use of
a monochromatic light source. This specification allows for greater
reproducibility of the measured values and greater agreement between
other measuring instruments. These two standards are compared
in Figure 8.
Conclusion
Turbidity is a very complex analytical measurement which can be
affected by many factors. To choose the best measuring system
for a specific application, all factors must be carefully considered
before selecting the appropriate turbidimeter. An important consideration
is the comparison of readings between different instruments calibrated
with the same standard. For reasons described in this bulletin,
it is unreasonable to expect different instruments to indicate
the same value for the same sample. On-line process instruments
should be used for trending information rather than for absolute
values.
Another
problem is the measurement of colored liquids. The color will
absorb some of the light, thereby reducing the light intensity.
As a result, the detector senses less scattered light, providing
a false, lower-than-actual turbidity reading. The single-beam
method also lacks the ability to provide a stable measurement
reading at higher levels of turbidity.
 Ratio
Method Ratio
Method
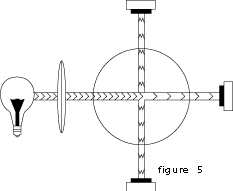
The ratio method expands upon the single-beam concept. In addition
to the one photodetector at 90° to the transmitted light, additional
detectors can be added at other angles as shown in Figure 5. Using
a ratio of the multiple detector system increases the stability
of the measured turbidity values. This design also cancels the
effects of light intensity reduction when measuring colored liquids,
making the turbidimeter color-compensated. Although a multiple
detector design using a ratio measurement method is an improvement
to the single-beam detector design, the problem with light source
decay and frequent calibration still exists.
Dual-Beam
Method
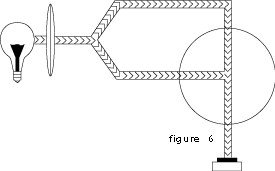
To minimize the effect of light source decay, a dual-beam method
was developed, as shown in Figure 6. This method uses a single
light source which is split by an oscillating mirror into two
beams: a measuring beam and a reference beam. The measurement
is made differentially with a single photo-detector detecting
the different light intensities of both beams. This method reduces
the need for frequent calibration and, when used with a monochromatic
light source, totally eliminates the need for calibration. Although
the dual-beam method minimizes or eliminates the need for frequent
calibration, it does not address the problem of unstable readings
at higher turbidity values.Figure 5 - Ratio Method Turbidimeter.
 Design
Modulated Four-Beam Method Design
Modulated Four-Beam Method
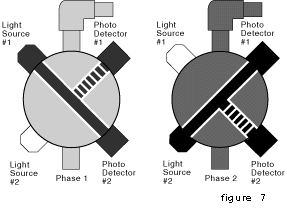
The modulated four-beam method uses two light sources and two
photodetectors. As Figure 7 illustrates, these components are
spaced at 90° intervals around a circular sample chamber. Every
half second, the sensor accomplishes two measurement phases, and
a microprocessor calculates a turbidity reading. In the first
phase, Light Source 1 momentarily pulses a light beam directly
into Photodetector 2. Simultaneously, Photodetector 1 measures
the light scattered at 90°.
In
the second phase, Light Source 2 momentarily pulses a light beam
directly into Photodetector 1. Simultaneously, Photodetector 2
measures the scattered light at 90°. Every time a light source
is illuminated, it provides both an active signal and a reference
signal. The two light sources are alternately pulsed. Likewise,
the two photodetectors alternate in reading either the active
signal or reference signal. This two phase measurement provides
four independent measurements from two light sources, using direct
strength readings from two detectors and 90° scattered light readings
from the same two detectors. The microprocessor uses a ratiometric
algorithm to calculate the turbidity value from these four readings.
Mathematically, this means that error effects appear both in the
numerator and the denominator-and thus are cancelled.
 The
modulated four-beam method cancels all error terms derived from
aging or fouling of components, and reduces errors due to color
factors. This method also offers the practical advantage that
light sources and detectors need not be matched to provide accurate
measurements.Figure 6 - Dual-Beam Method Turbidimeter Design The
modulated four-beam method cancels all error terms derived from
aging or fouling of components, and reduces errors due to color
factors. This method also offers the practical advantage that
light sources and detectors need not be matched to provide accurate
measurements.Figure 6 - Dual-Beam Method Turbidimeter Design
Reproduced
with the permission of Great Lakes Instruments, Inc.Figure 8 -
Comparison Between USEPA and ISO Turbidity Standards
1
Standard Methods for the Examination of Water and Wastewater,
APHA, AWWA and WPCF, 16th edition, 1985. Figure 2 - Angular Patterns
of Scattered Intensity for Three Basic Particle Sizes 22Brumberger,
et al, Light Scattering, Science and Technology, November, 1968,
page 38. Document #1234 On-line Publishing ServiceU.S.A. and Canada
For Technical Assistance: U.S.A. and Canada
| 


